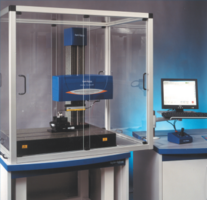
Stylus Instrument / Profilometer PGI1200

Examples of use:
- Examination of the surface topography even on slightly curved surfaces
- 3D-mappings for the determination of waviness and roughness
- Creation and evaluation of surface profiles of workpieces
Device configuration:
Horizontal Performance
- travers length - X Max / Min: 200mm / 0.1mm (7.9in / 0.004in)
- measuring speeds: 0.1mm/s, 0.25mm/s, 0.5mm/s & 0.1mm/s (0.004in/s, 0.01in/s, 0.02in/s & 0.04in/s)
- traverse speeds: 0.1-10mm/s (0.004-0.39in/s)
- data sampling interval in X: 0.125µm over 200mm length (5µin over 7.9in length)
- maximum number of data points: 1,600,000
- straightness error [Pt]: 125nm/200mm (10µin/7.9in)
- datum correction: standard
Vertical Performance
- nominal measuring range (Z): 12.55mm (60mm stylus arm) (0.49in [2.36in])
25mm (120mm stylus arm) (0.98in [4.72in]) - resolution (Z) ³ : 0.8nm @ 12.55mm range (0.03µin @ 0.49in range)
- range to resolution ratio ³ : 15,625,000 : 1
- stylus arm length, tip size, force: 66mm arm, 2µm radius conisphere diamond styling, 1mN force, 122mm arm, 0.5mm radius ball, 20mN force
- Z axis nonlinearity: (0.07 + 0.03 Z [mm]) µm (3 + 30 Z [inches]) µin - after calibration 4
- repeatability of Z axis indication (flat surface - diamond stylus): 0.15µm (6.1µin) 5
- repeatability of Z axis indication (curved surface - diamond stylus): 0.16µm (6.3µin) 5
- repeatability of Z axis indication (curved surface - ball stylus): 0.12µm (4.5µin) 5
- Four-Point Measurement of Resistance
- Abrasion Resistance
- Flame Treatment Units
- CGME – Controlled Growth Mercury Electrode
- Digital Microscope
- ECMC – Electrochemical MiniCell
- EDX-Analysis
- Planar Plasma Sources
- Fluorination
- FTIR Spectroscopy
- GDP-C
- Cross-Cut Tester
- Grey Scale Measurement
- Gravimetric Titrator – Alino®
- Hardness Tester
- Hardness and Micro Hardness Testing
- Infrared Camera - Vario THERM
- Infrared Thermometer (Pyrometer)
- Jet Plasmas
- Confocal Microscope
- Laboratory Electroplating
- Lacquer Testing Device Carving Graver
- Conductivity Measurement for Non-Ferrous Metals
- Optical Microscope Leica DMi8 C
- Mastersizer
- Optical Emission Spectrometer
- pH Value Determination
- pH/Conductivity Meter
- Plasma Polymerization
- Potentiostat / Galvanostat / ZRA
- Contact Angle Measuring Instrument
- Scanning Electron Microscope (SEM)
- Atomic Force Microscope (AFM)
- Roughness
- Rheometer MCR 301
- Rheometer MCR 502 TDR
- Scratch Hardness Tester
- X-Ray Fluorescence Unit Fischerscope
- X-Ray Photoelectron Spectrometer XPS
- Admittance
- Coating Thickness Gauge MiniTest 4100
- Coating Thickness Gauge Quint Sonic
- Sol-Gel Unit
- Spectral Ellipsometer SE850
- Sputter Technology
- Stylus Instrument / Profilometer Alpha-Step D-600
- Stylus Instrument / Profilometer PGI1200
- Thermal Evaporation
- Universal Testing Machine
- UV/VIS Spectrometer
- UV-VIS Spectroscopy
- Wear Test
- Videoextensiometer RTSS
- Xenon Arc Test
- Zeta Potential Measurement


